Introduction
I’ve been writing a journal in Google Docs for over a year now and I wanted to do some text analysis on what I’ve been writing about. Rather than importing the document as html and formatting the dataframe all in R, I decided to make a Google Docs add-on to export any text document as a CSV file.
The Data Format
In Google docs, if you use a table of contents it is automatically generated like this:
My Doc
- Section 1
- Part 1
- Part 2
- Section 2
Where you will have your text in each section.
To format that for text analysis I want it all in a table that denotes what section the text is under
| Title | H1 | H2 | Text |
|---|---|---|---|
| My Doc | Section 1 | Part 1 | Entry 1 |
| My Doc | Section 1 | Part 2 | Entry 2 |
| My Doc | Section 2 | Entry 3 |
Part 1: Basic Functionality
There are two main functions you’ll need to start your add-on.
- onInstall
- onOpen
onInstall is called when your add-on is first installed. Generally, since the user already has a document open when installing the add-on, onInstall is used to call onOpen so the user doesn’t have to refresh their page to see a menu on install.
function onInstall() {
onOpen();
}
onOpen is called when the document is opened and is used to create the add-on menu. Each menu item calls a function which we will use to run our add-on.
function onOpen() {
  var ui = DocumentApp.getUi();
  ui.createMenu('Export to CSV')
      .addItem('Export to CSV', 'exportDoc')
      .addToUi();

}
Part 2: Creating the CSV
Step one of getting this document into a CSV file is to create the exportDoc function.
function exportDoc(){
  //get current google doc
	var doc = DocumentApp.getActiveDocument();
	var body = doc.getBody();
	var paragraphs = body.getParagraphs();
  //set default values for each column
  var title = h1 = h2 = "";
  //create an array to make the csv
  var myExport = [];
  //define the newline character
  var newline = "\r\n";

  for (var i = 0; i < paragraphs.length; i++) {
    switch(paragraphs[i].getHeading()) {
    case DocumentApp.ParagraphHeading.TITLE:
        title = paragraphs[i].getText();
        break;
    case DocumentApp.ParagraphHeading.HEADING1:
        h1 = paragraphs[i].getText();
        break;
    case DocumentApp.ParagraphHeading.HEADING2:
        h2 = paragraphs[i].getText();
        break;
    default:
        myExport.push([title, h1, h2, paragraphs[i].getText()])
    }
  }
  Logger.log(myExport)
If you run this with some text in your document, you can check the logs from the script and see the array. To see the logs, go to View > Logs or press Ctrl + Enter from the script screen.
Now we just need to convert this array into CSV format. I’m just going to use a nested loop for now and surround each element with quotes, then combine all elements on a line with comma separation. Place this within the exportDoc function at the end, after the for loop.
//header for csv file.
//Used to define some characteristic for download
var csvContent = "data:text/csv;charset=UTF-8,";
//insert Header line
csvContent += "Title,H1,H2,Text" + newline;

//loop through each row
myExport.forEach(function(rowArray){
 //loop through each element
 rowArray.forEach(function(part, index, theArray) {
    theArray[index] = '"' +  part + '"';
});
//comma separated elements
var row = rowArray.join(",");
//finish row
csvContent += row + newline;
});
Logger.log(csvContent)
You can run exportDoc again and check the logs to make sure your string is being created.
Part 3: Downloading the File
All that’s left is to download the csvContent as a CSV file. You can give the csvContent through a URL with the following snippet.
var encodedUri = encodeURI(csvContent);
   return {
    url: encodedUri,
    filename: exportName+".csv"
  };
There is a caveat for this process. We can’t just start a download in Google docs. To start a download you have to give the csvContent object a URL and tell your browser to download it. However, we’re too limited in the Google Doc editor. Instead I’ll have to create another page where we can control more with Javascript. This can be done through the Export to CSV menu with the use of a Modal.
I created a download.html page that will execute the exportDoc function and automatically start the download.
<!DOCTYPE html>
<!-- Load the jQuery library from the Google CDN -->
<script src="//ajax.googleapis.com/ajax/libs/jquery/1.10.1/jquery.min.js"></script>

<script>
$( document ).ready(function() {
    // If the user presses the Enter key
   $('#name').keyup(function(e) {
      if (e.keyCode === 13) {
         $('#export_id').click();
      }
   });

   //run exportDoc function from code script
   $('#export_id').click(function() {
     google.script.run.withSuccessHandler(download).exportDoc($('#name').val());
   });

   //download the csv created
   function download(obj) {
    var d = document.createElement('a');
    d.href = obj.url;
    d.download = obj.filename;
    d.click();
  }
});

</script>

<div class="wrapper">
  <input type="text" id="name" value="myDocExport" />
  <button class="blue" id="export_id">Export</button>
</div>
Instead of calling exportDoc() through the add-on UI, now the app needs to open this page.
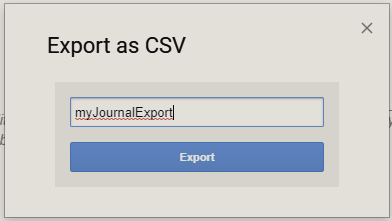
function exportDataModal() {
  var html = HtmlService.createHtmlOutputFromFile('download')
    .setWidth(300)
    .setHeight(113);
  DocumentApp.getUi().showModalDialog(html, 'Export as CSV');
}
And modify the menu to run this function.
function onOpen() {
  var ui = DocumentApp.getUi();
  ui.createMenu('Export to CSV')
      .addItem('Export to CSV', 'exportDataModal')
      .addToUi();

}
Finally, we can export our document. Go to the menu Export to CSV > Export to CSV, give the file a name, and download it.
(If you download through the add-on store, the menu will be in the add-ons menu)
Now you can import into whatever platform you plan on using for text analysis.
That’s how I converted a Google Document to CSV through a Google Docs add-on. I added a bit more styling to the menu, extended the CSV to include all header levels, and sanitized the the text to convert characters like quotes and dashes to utf-8 text format. You can view all those edits in GitHub here.
Once I finish up the promotional materials and get the add-on validated, you should be able to find it in the Google add-on store.